Log monitoring
This document describes how to construct log monitoring system with Hatohol.
Zabbix's log monitoring feature has the following problems:
- High CPU usage because all logs collected by Zabbix agent are evaluated on Zabbix server.
- High database load for processing many logs.
- Zabbix agent sends logs to Zabbix server on non secure connection.
Hatohol uses Fluentd for better log monitoring system.
Project Hatohol develops a Fluentd plugin Hatohol output plugin. It pushes received messages to AMQP broker. Hatohol [HAPI JSON](HAPI JSON) pulls messages from AMQP broker and registers each message as an event. Hatohol HAPI JSON uses RabbitMQ as AMQP broker.
Zabbix uses Zabbix agent to collect logs. Hatohol uses Fluentd plugins to collect logs. For example, Hatohol uses tail input plugin for collecting Apache logs.
Zabbix agent sends logs on non secure connection. If you want to use secure connection, you need to create a secure tunnel by stunnel by hand. Hatohol can use secure connection for sending logs by secure_forwared input/output plugin.
Zabbix monitors logs on Zabbix server. Hatohol monitors logs on Fluentd with some Fluentd plugins. For example, Hatohol uses grep output plugin for selecting target log by regular expression.
You can't select log monitoring system architecture with Zabbix. You always need to select logs on Zabbix server.
Here is the log monitoring system architecture with Zabbix:
+------------+ Monitoring
|Zabbix agent| target
+------------+ node
collects and sends logs
|
| non secure connection
|
\/
+-------------+
|Zabbix server|
+-------------+
receives logs and selects target logs by keywords
You can select log monitoring system architecture from some architecture patterns with Hatohol. Because Fluentd supports forwarding logs.
Here is the simplest log monitoring architecture with Hatohol:
+-------------+ +-------------+ +-------------+ Monitoring
|Fluentd      | |Fluentd      | |Fluentd      | target
|with plugins | |with plugins | |with plugins | nodes
+-------------+ +-------------+ +-------------+
collects,       collects,       collects,
selects and     selects and     selects and
pushes logs     pushes logs     pushes logs
|                     |               |
| secure connection   |               |
|                     |               |
\/                    \/              \/
+--------+
|RabbitMQ|
+--------+
|
| secure connection
|
\/
+---------+
|Hatohol  |
|HAPI JSON|
+---------+
pull logs
Here is a log monitoring system architecture with Hatohol for system that each monitoring target node has idle CPU:
+-------------+ +-------------+ +-------------+ Monitoring
|Fluentd      | |Fluentd      | |Fluentd      | target
|with plugins | |with plugins | |with plugins | nodes
+-------------+ +-------------+ +-------------+
collects,       collects,       collects,
selects and     selects and     selects and
forwards logs   forwards logs   forwards logs
|                     |               |
| secure connection   |               |
|                     |               |
\/                    \/              \/
+--------------------+
|Fluentd             | AMQP producer node
|with Hatohol plugin |
+--------------------+
receives all selected logs and pushes them
|
| secure connection
|
\/
+--------+
|RabbitMQ|
+--------+
|
| secure connection
|
\/
+---------+
|Hatohol  |
|HAPI JSON|
+---------+
pull logs
Here is a log monitoring system architecture with Hatohol for system that each monitoring target node doesn't have idle CPU:
+-------------+ +-------------+ +-------------+ Monitoring
|Fluentd      | |Fluentd      | |Fluentd      | target
|with plugins | |with plugins | |with plugins | nodes
+-------------+ +-------------+ +-------------+
collects and    collects and    collects and
forwards logs   forwards logs   forwards logs
|                     |               |
| secure connection   |               |
|                     |               |
\/                    \/              \/
+-------------+ +-------------+
|Fluentd      | |Fluentd      | Log select nodes
|with plugins | |with plugins |
+-------------+ +-------------+
selects and     selects and
forwards logs   forwards logs
|                     |
| secure connection   |
|                     |
\/                    \/
+--------------------+
|Fluentd             | AMQP producer node
|with Hatohol plugin |
+--------------------+
receives all selected logs and pushes them
|
| secure connection
|
\/
+--------+
|RabbitMQ|
+--------+
|
| secure connection
|
\/
+---------+
|Hatohol  |
|HAPI JSON|
+---------+
pull logs
This section describes about the following architectures:
- Monitoring target nodes only architecture
- Monitoring target nodes + AMQP producer node architecture
- Monitoring target nodes + log select nodes + AMQP producer node architecture
They are architectures described in the previous section.
In this section, we assume that all nodes use CentOS 6.
Confirm host name is valid:
% hostname
node1.example.com
If host name isn't valid, you can set host name by the following:
% sudo vi /etc/sysconfig/network
(Change HOSTNAME= line.)
% sudo /sbin/shutdown -r now
% hostname
node1.example.com
(Confirm your host name.)
In monitoring target nodes only architecture, you need to set up the following node types:
- Certificate authority (CA)
- AMQP broker (RabbitMQ)
- Hatohol HAPI JSON
- Monitoring target nodes
The following subsections describe about how to set up each node type.
Set up TLS for security. Hatohol provides convenience scripts to set up TLS available RabbitMQ, Hatohol HAPI JSON and Fluentd. You can generate TLS related files with them.
You need the following hosts:
-
ca.example.com: It hosts the certificate authority (CA) of your system. It must be the most secure host in your system. -
rabbitmq.example.com: It runs RabbitMQ. It uses server certificate. -
hatohol.example.com: It runs Hatohol. It uses client certificate. -
node1.example.com: It runs a service and Fluentd that collects logs for the service. It uses client certificate. -
node2.example.com: Ditto.
First, you need to install Hatohol:
[ca.example.com]% sudo -H yum install hatohol
Now, you can use hatohol-ca-initialize that creates new CA for you.
Initialize CA on ca.example.com:
[ca.example.com]% sudo -H hatohol-ca-initialize
Generating a 2048 bit RSA private key
.........................................+++
...............................+++
writing new private key to '/var/lib/hatohol/CA/private/ca-key.pem'
-----
You need to log in to the CA host to sign server certificate and client certificates in the later instructions.
You need to install RabbitMQ as a AMQP broker. You can install RabbitMQ by EPEL.
First, enable EPEL:
% sudo -H rpm -Uvh http://ftp.jaist.ac.jp/pub/Linux/Fedora/epel/6/i386/epel-release-6-8.noarch.rpm
Install RabbitMQ:
% sudo -H yum install -y rabbitmq-server
% sudo -H chkconfig rabbitmq-server on
% sudo -H service rabbitmq-server start
Set up authentication information for security. You need to add the following two users:
-
hatohol- Purpose: To connect to RabbitMQ from Hatohol HAPI JSON.
- Password:
hatohol-password - URI:
amqps://hatohol:[email protected]/hatohol
-
fluentd:- Purpose: To connect to RabbitMQ from Fluentd.
- Password:
fluentd-password - URI:
amqps://fluentd:[email protected]/hatohol
Here are command lines to set up the above authentication information:
% sudo -u rabbitmq -H /usr/sbin/rabbitmqctl add_user hatohol hatohol-password
% sudo -u rabbitmq -H /usr/sbin/rabbitmqctl add_user fluentd fluentd-password
% sudo -u rabbitmq -H /usr/sbin/rabbitmqctl add_vhost hatohol
% sudo -u rabbitmq -H /usr/sbin/rabbitmqctl set_permissions -p hatohol hatohol '^gate\..*' '' '.*'
% sudo -u rabbitmq -H /usr/sbin/rabbitmqctl set_permissions -p hatohol fluentd '^gate\..*' '.*' ''
Create a server certificate for RabbitMQ on
rabbitmq.example.com. Don't forget to specify the correct host name:
[rabbitmq.example.com]% cd /etc/rabbitmq
[rabbitmq.example.com]% sudo -H curl --fail -O https://raw.githubusercontent.com/project-hatohol/hatohol/master/server/tools/tls/hatohol-server-certificate-create
[rabbitmq.example.com]% sudo -H chmod +x hatohol-server-certificate-create
[rabbitmq.example.com]% sudo -H ./hatohol-server-certificate-create --host-name rabbitmq.example.com
Generating RSA private key, 2048 bit long modulus
.+++
..............+++
e is 65537 (0x10001)

The next action:
Copy <./req.pem> to CA host and run the following command:
  % hatohol-ca-sign-server-certificate req.pem
Copy req.pem to ca.example.com and sign the certificate request by
your CA:
[rabbitmq.example.com]% scp req.pem ca.example.com:
[ca.example.com]% sudo -H hatohol-ca-sign-server-certificate req.pem
Using configuration from /var/lib/hatohol/openssl.cnf
Check that the request matches the signature
Signature ok
The Subject's Distinguished Name is as follows
commonName            :ASN.1 12:'rabbitmq.example.com'
organizationName      :ASN.1 12:'server'
Certificate is to be certified until Aug 23 09:22:09 2024 GMT (3650 days)

Write out database with 1 new entries
Data Base Updated

The next action:
Copy <server-cert.pem> to server host and
use it in your application such as RabbitMQ.
Copy /var/lib/hatohol/CA/ca-cert.pem and server-cert.pem to
rabbitmq.example.com and use them in RabbitMQ:
[ca.example.com]% scp /var/lib/hatohol/CA/ca-cert.pem server-cert.pem rabbitmq.example.com:
[rabbitmq.example.com]% sudo -H mv ca-cert.pem server-cert.pem /etc/rabbitmq/
[rabbitmq.example.com]% sudo -H chown -R rabbitmq:rabbitmq /etc/rabbitmq/
Edit /etc/rabbitmq/rabbitmq.config:
[
  {rabbit, [
    {ssl_listeners, [5671]},
    {ssl_options, [
      {cacertfile, "/etc/rabbitmq/ca-cert.pem"},
      {certfile, "/etc/rabbitmq/server-cert.pem"},
      {keyfile, "/etc/rabbitmq/key.pem"},
      {verify, verify_peer},
      {fail_if_no_peer_cert, false}
    ]}
  ]}
].
Don't forget the last .!
Restart RabbitMQ:
% sudo -H service rabbitmq-server restart
Now, you can access RabbitMQ with secure connection.
Install MySQL:
% sudo -H yum install -y mysql-server
% sudo -H chkconfig mysqld on
% sudo -H service mysqld start
Install Hatohol:
% sudo -H yum install -y hatohol
Set up MySQL for Hatohol:
% mysql -u root < /usr/share/hatohol/sql/create-db.sql
Start Hatohol:
% sudo -H chkconfig hatohol on
% sudo -H service hatohol start
Create a client certificate for Hatohol on
hatohol.example.com. Don't forget to specify the correct host name:
[hatohol.example.com]% sudo mkdir -p /etc/hatohol
[hatohol.example.com]% cd /etc/hatohol
[hatohol.example.com]% sudo -H hatohol-client-certificate-create --host-name hatohol.example.com
Generating RSA private key, 2048 bit long modulus
................+++
......................................+++
e is 65537 (0x10001)

The next action:
Copy <./req.pem> to CA host and run the following command:
  % hatohol-ca-sign-client-certificate req.pem
Copy req.pem to ca.example.com and sign the certificate request by
your CA:
[hatohol.example.com]% scp req.pem ca.example.com:
[ca.example.com]% sudo -H hatohol-ca-sign-client-certificate req.pem
Using configuration from /var/hatohol/openssl.cnf
Check that the request matches the signature
Signature ok
The Subject's Distinguished Name is as follows
commonName            :ASN.1 12:'hatohol.example.com'
organizationName      :ASN.1 12:'client'
Certificate is to be certified until Sep  7 05:26:57 2024 GMT (3650 days)

Write out database with 1 new entries
Data Base Updated

The next action:
Copy </var/lib/hatohol/CA/ca-cert.pem> and <client-cert.pem> to client host and
use it in your application such as Hatohol and Fluentd.
Copy /var/lib/hatohol/CA/ca-cert.pem and client-cert.pem to
hatohol.example.com and use them in Hatohol:
[ca.example.com]% scp /var/lib/hatohol/CA/ca-cert.pem client-cert.pem hatohol.example.com:
[hatohol.example.com]% sudo -H mv ca-cert.pem client-cert.pem /etc/hatohol/
[hatohol.example.com]% sudo -H chown -R hatohol:hatohol /etc/hatohol/
Register HAPI JSON entry with TLS configuration on Web UI.
The following screenshot is the one of Hatohol 14.12. The latest Hatohol may provide more improved UI.
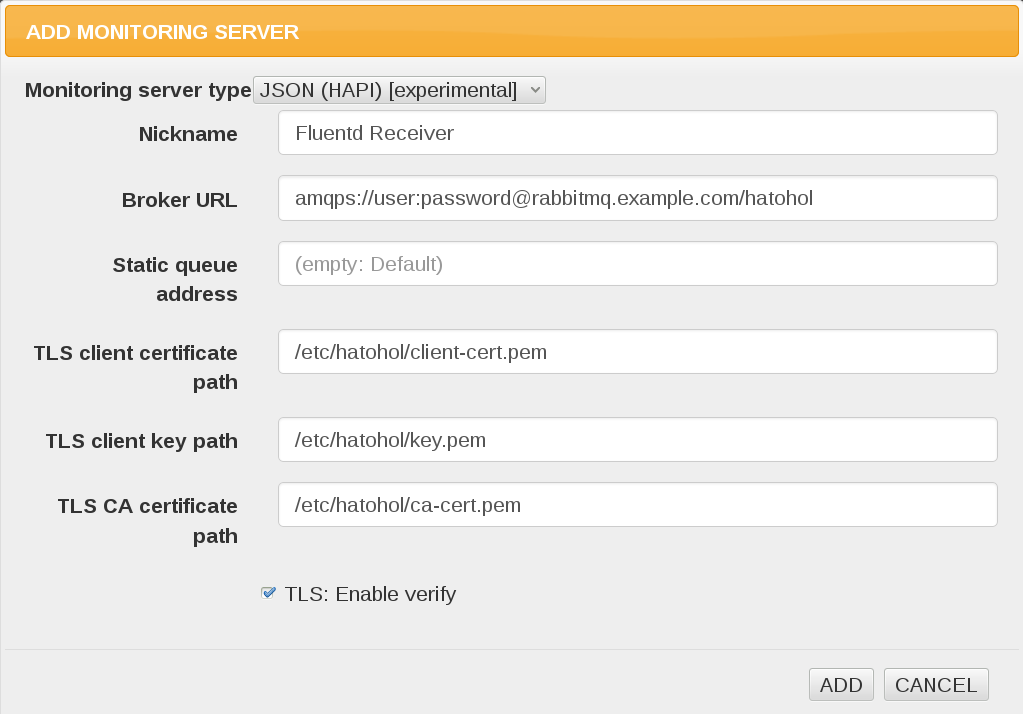
Use the following configurations:
- Specify CA certificate at
/etc/hatohol/ca-cert.pem. - Specify client key at
/etc/hatohol/key.pem. - Specify client certificate at
/etc/hatohol/client-cert.pem. - Use
amqps://hatohol:[email protected]/hatoholas broker URL.
Confirm that the following message exists in /var/log/messages:
[INFO] <AMQPConsumer.cc:52> Broker URL: <amqps://rabbitmq.example.com:5671/hatohol>
[INFO] <AMQPConsumer.cc:378> Queue: <gate.1>
The number after gate. (1 in the example) may be
different. gate.1 is used later to set up monitoring target
nodes. Remember it.
Now, you can pulls events from RabbitMQ.
You need to set up Fluentd on all monitoring target nodes.
Fluentd recommends to install ntpd to use valid timestamp.
See also: Before Installing Fluentd | Fluentd
Install and run ntpd:
% sudo yum install -y ntp
% sudo chkconfig ntpd on
% sudo service ntpd start
Install Fluentd:
% curl -L http://toolbelt.treasuredata.com/sh/install-redhat-td-agent2.sh | sh
% sudo chkconfig td-agent on
See also: Installing Fluentd Using rpm Package | Fluentd
Note: td-agent is a Fluentd distribution provided by Treasure Data, Inc.. Td-agent provides init script. So it is suitable for server use.
Install plugins:
% sudo td-agent-gem install fluent-plugin-hatohol
% sudo td-agent-gem install fluent-plugin-grep
Create a client certificate for Fluentd on
node1.example.com. Don't forget to specify the correct host name:
[node1.example.com]% cd /etc/td-agent
[node1.example.com]% sudo -H curl --fail -O https://raw.githubusercontent.com/project-hatohol/hatohol/master/server/tools/tls/hatohol-client-certificate-create
[node1.example.com]% sudo -H chmod +x hatohol-client-certificate-create
[node1.example.com]% sudo -H ./hatohol-client-certificate-create --host-name node1.example.com
Generating RSA private key, 2048 bit long modulus
.......+++
..........................................................+++
e is 65537 (0x10001)

The next action:
Copy <./req.pem> to CA host and run the following command:
  % hatohol-ca-sign-client-certificate req.pem
Copy req.pem to ca.example.com and sign the certificate request by
your CA:
[node1.example.com]% scp req.pem ca.example.com:
[ca.example.com]% sudo -H hatohol-ca-sign-client-certificate req.pem
Copy /var/lib/hatohol/CA/ca-cert.pem and client-cert.pem to
node1.example.com and use them in Fluentd:
[ca.example.com]% scp /var/lib/hatohol/CA/ca-cert.pem client-cert.pem node1.example.com:
[node1.example.com]% sudo -H mv ca-cert.pem client-cert.pem /etc/td-agent/
[node1.example.com]% sudo -H chown -R root:root /etc/td-agent/
[node1.example.com]% sudo -H chown -R td-agent:td-agent /etc/td-agent/key.pem
Configure Fluentd:
% sudo mkdir -p /var/spool/td-agent/buffer/
% sudo chown -R td-agent:td-agent /var/spool/td-agent/
% sudo chmod g+r /var/log/messages
% sudo chgrp td-agent /var/log/messages
Create /etc/td-agent/td-agent.conf:
<source>
  type tail
  format syslog
  path /var/log/messages
  pos_file /var/log/td-agent/messages.pos
  tag syslog.messages
</source>

<match syslog.**>
  type grep
  regexp1 message ERR
  add_tag_prefix hatohol
</match>

<match hatohol.**>
  type hatohol

  buffer_type file
  buffer_path /var/spool/td-agent/buffer/hatohol
  flush_interval 1

  url amqps://fluentd:[email protected]/hatohol

  tls_cert /etc/td-agent/client-cert.pem
  tls_key /etc/td-agent/key.pem
  tls_ca_certificates ["/etc/td-agent/ca-cert.pem"]

  queue_name gate.1
</match>
Note that queue_name value (gate.1 in the above configuration)
must be the same value of the output by Hatohol HAPI JSON. Hatohol
HAPI JSON outputs the following message at start:
[INFO] <AMQPConsumer.cc:378> Queue: <gate.1>
Ensure starting Fluentd:
% sudo service td-agent restart
Try the following command to confirm your system works well:
% logger 'ERR: error message'
The command logs a message that has "ERR" keyword into
/var/log/messages. Fluentd will collect the message and push it to
RabbitMQ. Hatohol HAPI JSON pulls the message from RabbitMQ and
register to the Hatohol database.
You will find the message in event list page on Hatohol client.
In monitoring target nodes + AMQP producer node architecture, you need to set up the following node types:
- Certificate authority (CA)
- AMQP broker (RabbitMQ)
- Hatohol HAPI JSON
- Monitoring target nodes
- AMQP producer node <- NEW!
The following subsections describe about how to set up "monitoring target nodes" type and "AMQP producer node" type. See the above sections for other types.
We use the following as the secret key to forward messages between Fluentd with secure connection:
fluentd-secret
Here are host names of monitoring target nodes:
- node1.example.com
- node2.example.com
- node3.example.com
Here is the host name of AMQP producer node:
- producer.example.com
You need to set up Fluentd on all monitoring target nodes.
Fluentd recommends to install ntpd to use valid timestamp.
See also: Before Installing Fluentd | Fluentd
Install and run ntpd:
% sudo yum install -y ntp
% sudo chkconfig ntpd on
% sudo service ntpd start
Install Fluentd:
% curl -L http://toolbelt.treasuredata.com/sh/install-redhat-td-agent2.sh | sh
% sudo chkconfig td-agent on
See also: Installing Fluentd Using rpm Package | Fluentd
Note: td-agent is a Fluentd distribution provided by Treasure Data, Inc.. Td-agent provides init script. So it is suitable for server use.
Install plugins:
% sudo td-agent-gem install fluent-plugin-grep
% sudo td-agent-gem install fluent-plugin-secure-forward
Configure Fluentd:
% sudo chmod g+r /var/log/messages
% sudo chgrp td-agent /var/log/messages
% sudo mkdir -p /var/spool/td-agent/buffer/
% sudo chown -R td-agent:td-agent /var/spool/td-agent/
Create /etc/td-agent/td-agent.conf:
<source>
  type tail
  format syslog
  path /var/log/messages
  pos_file /var/log/td-agent/messages.pos
  tag syslog.messages
</source>

<match syslog.**>
  type grep
  regexp1 message ERR
  add_tag_prefix hatohol
</match>

<match hatohol.**>
  type secure_forward
  shared_key fluentd-secret
  self_hostname "#{Socket.gethostname}"
  <server>
    host producer.example.com
  </server>

  buffer_type file
  buffer_path /var/spool/td-agent/buffer/secure-forward
  flush_interval 1
</match>
All monitoring target nodes must be able to resolve the producer node
name. The producer node name is producer.example.com in this
example.
Confirm that a monitoring target node can resolve the producer node name:
% ping -c 1 producer.example.com
If you get the following error message, you must configure your DNS or
edit your /etc/hosts.
ping: unknown host producer.example.com
Ensure starting Fluentd after a monitoring target node can resolve the producer node name:
% sudo service td-agent restart
You need to set up Fluentd on AMQP producer node.
Fluentd recommends to install ntpd to use valid timestamp.
See also: Before Installing Fluentd | Fluentd
Install and run ntpd:
% sudo yum install -y ntp
% sudo chkconfig ntpd on
% sudo service ntpd start
Install Fluentd:
% curl -L http://toolbelt.treasuredata.com/sh/install-redhat-td-agent2.sh | sh
% sudo chkconfig td-agent on
See also: Installing Fluentd Using rpm Package | Fluentd
Note: td-agent is a Fluentd distribution provided by Treasure Data, Inc.. Td-agent provides init script. So it is suitable for server use.
Install plugins:
% sudo td-agent-gem install fluent-plugin-secure-forward
% sudo td-agent-gem install fluent-plugin-hatohol
Create a client certificate for Fluentd on
producer.example.com. Don't forget to specify the correct host name:
[node1.example.com]% cd /etc/td-agent
[node1.example.com]% sudo -H curl --fail -O https://raw.githubusercontent.com/project-hatohol/hatohol/master/server/tools/tls/hatohol-client-certificate-create
[node1.example.com]% sudo -H chmod +x hatohol-client-certificate-create
[node1.example.com]% sudo -H ./hatohol-client-certificate-create --host-name producer.example.com
Generating RSA private key, 2048 bit long modulus
.......+++
..........................................................+++
e is 65537 (0x10001)

The next action:
Copy <./req.pem> to CA host and run the following command:
  % hatohol-ca-sign-client-certificate req.pem
Copy req.pem to ca.example.com and sign the certificate request by
your CA:
[producer.example.com]% scp req.pem ca.example.com:
[ca.example.com]% sudo -H hatohol-ca-sign-client-certificate req.pem
Copy /var/lib/hatohol/CA/ca-cert.pem and client-cert.pem to
producer.example.com and use them in Fluentd:
[ca.example.com]% scp /var/lib/hatohol/CA/ca-cert.pem client-cert.pem producer.example.com:
[producer.example.com]% sudo -H mv ca-cert.pem client-cert.pem /etc/td-agent/
[producer.example.com]% sudo -H chown -R root:root /etc/td-agent/
[producer.example.com]% sudo -H chown -R td-agent:td-agent /etc/td-agent/key.pem
Configure Fluentd:
% sudo mkdir -p /var/spool/td-agent/buffer/
% sudo chown -R td-agent:td-agent /var/spool/td-agent/
Create /etc/td-agent/td-agent.conf:
<source>
  type secure_forward
  shared_key fluentd-secret
  self_hostname "#{Socket.gethostname}"
  cert_auto_generate yes
</source>

<match hatohol.**>
  type hatohol

  buffer_type file
  buffer_path /var/spool/td-agent/buffer/hatohol
  flush_interval 1

  url amqps://fluentd:[email protected]/hatohol

  tls_cert /etc/td-agent/client-cert.pem
  tls_key /etc/td-agent/key.pem
  tls_ca_certificates ["/etc/td-agent/ca-cert.pem"]

  queue_name gate.1
</match>
Ensure starting Fluentd:
% sudo service td-agent restart
Try the following command to confirm your system works well on
node1.example.com:
[node1.example.com]% logger 'ERR: error message'
The command logs a message that has "ERR" keyword into
/var/log/messages. Fluentd on node1.example.com will collect the
message and forward it to Fluentd on producer.example.com with
secure connection. Fluentd on producer.example.com will receive the
message with secure connection and push it to RabbitMQ. Hatohol HAPI
JSON pulls the message from RabbitMQ and register to the Hatohol
database.
You will find the message in event list page on Hatohol client.
In monitoring target nodes + log select nodes + AMQP producer node architecture, you need to set up the following node types:
- Certificate authority (CA)
- AMQP broker (RabbitMQ)
- Hatohol HAPI JSON
- Monitoring target nodes
- Log select nodes <- NEW!
- AMQP producer node
The following subsections describe about how to set up "monitoring target nodes" type and "log select node" type. See the above sections for other types.
We use the following as the secret key to forward messages between Fluentd with secure connection:
fluentd-secret
Here are host names of monitoring target nodes:
- node1.example.com
- node2.example.com
- node3.example.com
Here are host names of log select nodes:
- select1.example.com
- select2.example.com
Here is the host name of AMQP producer node:
- producer.example.com
You need to set up Fluentd on all monitoring target nodes.
Fluentd recommends to install ntpd to use valid timestamp.
See also: Before Installing Fluentd | Fluentd
Install and run ntpd:
% sudo yum install -y ntp
% sudo chkconfig ntpd on
% sudo service ntpd start
Install Fluentd:
% curl -L http://toolbelt.treasuredata.com/sh/install-redhat-td-agent2.sh | sh
% sudo chkconfig td-agent on
See also: Installing Fluentd Using rpm Package | Fluentd
Note: td-agent is a Fluentd distribution provided by Treasure Data, Inc.. Td-agent provides init script. So it is suitable for server use.
Install plugins:
% sudo td-agent-gem install fluent-plugin-secure-forward
Configure Fluentd:
% sudo chmod g+r /var/log/messages
% sudo chgrp td-agent /var/log/messages
% sudo mkdir -p /var/spool/td-agent/buffer/
% sudo chown -R td-agent:td-agent /var/spool/td-agent/
Create /etc/td-agent/td-agent.conf:
<source>
  type tail
  format syslog
  path /var/log/messages
  pos_file /var/log/td-agent/messages.pos
  tag syslog.messages
</source>

<match syslog.**>
  type secure_forward
  shared_key fluentd-secret
  self_hostname "#{Socket.gethostname}"
  <server>
    host select1.example.com
  </server>
  <server>
    host select2.example.com
  </server>

  buffer_type file
  buffer_path /var/spool/td-agent/buffer/secure-forward
  flush_interval 1
</match>
All monitoring target nodes must be able to resolve names of all log
select nodes. Names of all log select nodes are select1.example.com
and select2.example.com in this example.
Confirm that a monitoring target node can resolve names of all log select nodes:
% ping -c 1 select1.example.com
% ping -c 1 select2.example.com
If you get the following error message, you must configure your DNS or
edit your /etc/hosts.
ping: unknown host select1.example.com
Ensure starting Fluentd after a monitoring target node can resolve names of all log select nodes:
% sudo service td-agent restart
You need to set up Fluentd on all log select nodes.
Fluentd recommends to install ntpd to use valid timestamp.
See also: Before Installing Fluentd | Fluentd
Install and run ntpd:
% sudo yum install -y ntp
% sudo chkconfig ntpd on
% sudo service ntpd start
Install Fluentd:
% curl -L http://toolbelt.treasuredata.com/sh/install-redhat-td-agent2.sh | sh
% sudo chkconfig td-agent on
See also: Installing Fluentd Using rpm Package | Fluentd
Note: td-agent is a Fluentd distribution provided by Treasure Data, Inc.. Td-agent provides init script. So it is suitable for server use.
Install plugins:
% sudo td-agent-gem install fluent-plugin-grep
% sudo td-agent-gem install fluent-plugin-secure-forward
Configure Fluentd:
% sudo mkdir -p /var/spool/td-agent/buffer/
% sudo chown -R td-agent:td-agent /var/spool/td-agent/
Create /etc/td-agent/td-agent.conf:
<source>
  type secure_forward
  shared_key fluentd-secret
  self_hostname "#{Socket.gethostname}"
  cert_auto_generate yes
</source>

<match syslog.**>
  type grep
  regexp1 message ERR
  add_tag_prefix hatohol
</match>

<match hatohol.**>
  type secure_forward
  shared_key fluentd-secret
  self_hostname "#{Socket.gethostname}"
  <server>
    host producer.example.com
  </server>

  buffer_type file
  buffer_path /var/spool/td-agent/buffer/secure-forward
  flush_interval 1
</match>
All monitoring target nodes must be able to resolve the producer node
name. The producer node name is producer.example.com in this
example.
Confirm that a monitoring target node can resolve the producer node name:
% ping -c 1 producer.example.com
If you get the following error message, you must configure your DNS or
edit your /etc/hosts.
ping: unknown host producer.example.com
Ensure starting Fluentd after a monitoring target node can resolve the producer node name:
% sudo service td-agent restart
Try the following command to confirm your system works well on
node1.example.com:
[node1.example.com]% logger 'ERR: error message'
The command logs a message that has "ERR" keyword into
/var/log/messages. Fluentd on node1.example.com will collect
messages and forward them to Fluentd on select1.example.com with
secure connection. Fluentd on select1.example.com will receive
messages with secure connection, select target messages and forward
them to Fluentd on producer.example.com with secure connection. Fluentd on producer.example.com` will receive selected
messages with secure connection and push them to RabbitMQ. Hatohol
HAPI JSON pulls messages from RabbitMQ and register them to the
Hatohol database.
You will find the message in event list page on Hatohol client.